Can I use the CLiR panel on PC or Mac?
Yes, both. As long as you are using one of these Photoshop versions:
Photoshop CC 2018 (v19.1.9),
Photoshop CC 2019 (v20.7),
Photoshop 2020 (v21.0.0),
Photoshop 2021 (v22.0.0),
Photoshop 2022 (v23.0.0),
Photoshop 2023 (v24.0.0),
Photoshop 2024 (v25.0.0) and onwards…
Note: Photoshop CS is not supported due to advanced features needed in CLiR panel (use of Camera RAW, profiles and Smart Objects)
What version of Photoshop is compatible with CLiR panel ?
You should be using one of these Photoshop versions:
Photoshop CC 2018 (v19.1.9),
Photoshop CC 2019 (v20.7),
Photoshop 2020 (v21.0.0),
Photoshop 2021 (v22.0.0),
Photoshop 2022 (v23.0.0),
Photoshop 2023 (v24.0.0),
Photoshop 2024 (v25.0.0) and onwards…
Note: Photoshop CS is not supported due to advanced features needed in CLiR panel (use of Camera RAW, profiles and Smart Objects)
– CLiR panel extension will not work with Photoshop Elements
– CLiR panel extension will not work with with Lightroom
– CLiR panel extension will not work with ON1 Photo RAW
– CLiR panel extension will not work with Capture One
– CLiR panel is in English, but is fully functional on all languages of Photoshop
Is Photoshop Elements compatible with CLiR panel ?
Photoshop Elements is not supported due to advanced features needed in CLiR panel (use of Camera RAW, profiles and Smart Objects). Some of the training in the tutorial package may apply.
I'm a Photoshop user. Can you explain how to install CLiR Panel?
- Sure! First, make sure no Adobe product is running (LightRoom, Bridge, Photoshop…).
Quit all Adobe applications if any are opened. - Locate the CLiR panel folder in your CLiR downloaded materials :
 |
00_CLiR_IR_Mastery_Start_Here => Extras => CLiR_Panel_1_2_1 (put in CEP Extensions folder) |
- Select this folder, and right-click on it
- Select “Copy”
- Do not rename it or change anything inside of it
- Locate the below location
For Windows users, go to :
C:\Program Files (x86)\Common Files\Adobe\CEP\extensions
For Mac users, go to :
/Library/Application Support/Adobe/CEP/extensions
- “Paste” the folder in the location above
- Close all windows and restart your computer (PC)
- Open Photoshop again
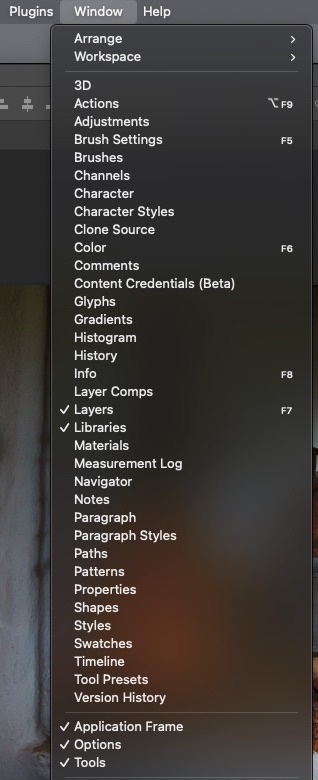
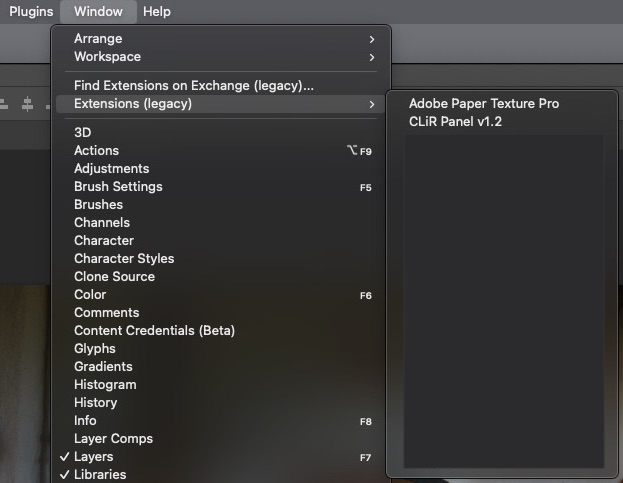
- Go to the top menu bar Windows > Extensions (legacy)
- Click on CLiR Panel in the list, and voila!
For more illustrated information, follow directions described in the document CLIR USER MANUAL (HD) 2021.pdf, starting from page 6; or watch the video 00_CLiR_IR_Mastery_Start_
Note: If you can’t see CLiR panel in the top menu bar Windows > Extensions (legacy), read below…
I want to use CLiR panel on my new computer. I had it installed on my previous computer. I copied the CLiR panel folder to my new system but Photoshop is giving me an error message : "The CLiR Panel" extension could not be loaded because it was not properly signed..."
In case you’re getting that kind of dialog :
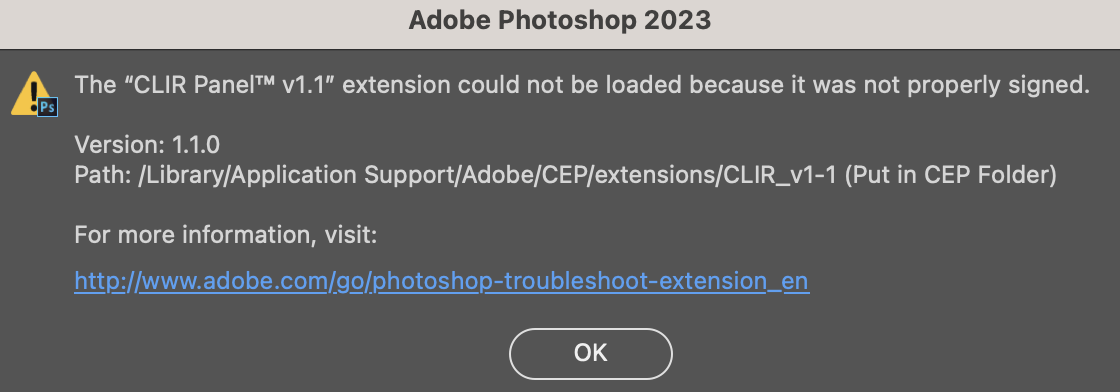
What does this mean? The installation of the panel needs attention. It is not recommended to copy/paste the CLiR Panel folder from a computer’s system to one another.
To solve this, simply copy/paste the CLiR folder from your original download contents. Here’s how.
First, let’s locate the folder you need for CLiR panel installation.
When you have downloaded your CLiR purchase, you should have two ZIP files:
00_CLiR_IR_Mastery_Start_Here.
and
CLiR_IR_Mastery_Modules_1-4.
You will then unzip these two archives onto your desktop, and you will have these two folders:
00_CLiR_IR_Mastery_Start_Here
and
CLiR_IR_Mastery_Modules_1-4
Now, let’s go ahead and activate the panel
- If any Adobe applications are running, kindly quit them all
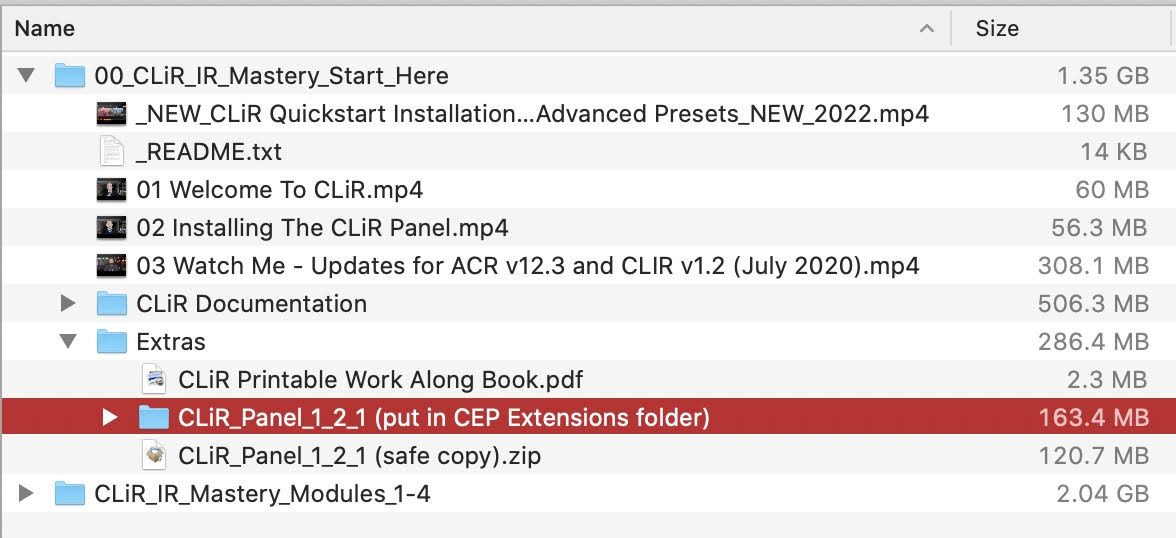
- Open folder “00_CLiR_IR_Mastery_Start_
Here“ - Go to “Extras“
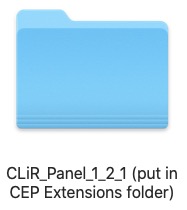
- Find the folder “CLiR_Panel_1_2_1 (put in CEP Extensions folder)“
- IMPORTANT : If you do not see this exact folder name, email me
- Select this exact folder “CLiR_Panel_1_2_1 (put in CEP Extensions folder)“
- Copy it
- For Windows, paste it to the location:C:\Program Files (x86)\Common Files\Adobe\CEP\extensions
- For Mac, paste it to the location:/Library/Application Support/Adobe/CEP/extensions
- Open Photoshop
- Go to top menu bar “Windows” > “Extensions (legacy)” and CLiR panel will be there.
Done 🙂
 Above: the folder holding CLiR panel : CLiR_Panel_1_2_1 (put in CEP Extensions folder)
For more information:
Directions for CLiR panel installation are described in the CLIR USER MANUAL (HD) 2021.pdf, starting from page 6.
Watch the video “00_CLiR_IR_Mastery_Start_Here” => “02 Installing The CLiR Panel.mp4“
Can I use CLiR Panel on latest MacOS Ventura & Sonoma ?
Yes, you can. CLiR Panel has been successfully running on :
MacOS Catalina (10.5), Big Sur (11), Monterey (12), Ventura (13), and Sonoma (14).
Note that if you are running MacOS 11, 12 or 13, you would need to use Rosetta mode to activate CLiR Panel within Photoshop.
For more details, be sure to check the next sections about Rosetta, CLiR Panel and Photoshop.
I'm using an Apple Mac Silicon with the M1, M2, or M3 chipset. I've been told that panel like CLiR don't work. What shall I do?
CLiR panel will work on Mac with M1, M2 or M3, no problem.
Follow these steps:
- quit Photoshop
- on your Mac, look for the Applications folder
- find your Photoshop application icon inside
- select the icon and right-click on it
- click “Get Info”
- In the popup window, just tick the box “Open using Rosetta”
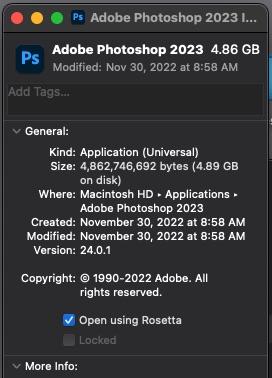
- Close that window
- Open Photoshop again.
- Go to the top menu bar Windows > Extensions (legacy)
- Click on CLiR Panel in the list, and voila !
I own the latest Photoshop 2022 (v23) / Photoshop 2023 (v24) / Photoshop 2024 (v25), and I can't see the CLiR panel ! What shall I do?
If the menu choice Window > Extensions (legacy) is not visible (or greyed out)
Follow these steps to reveal the CLiR Panel:
- launch Photoshop
- open Preferences : go to Photoshop > Preferences and choose Plugins section
- tick the box “Load Extension Panels”
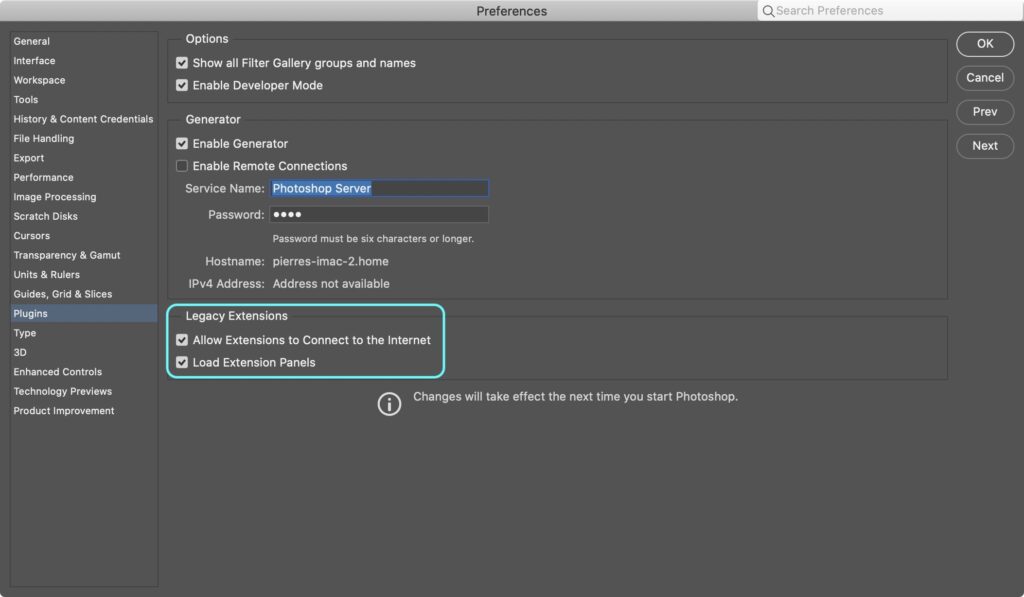
- confirm with OK
- quit Photoshop
- open Photoshop again
- the top menu bar Windows > Extensions (legacy) should show
- click on CLiR Panel in the list, and voila!
Note : if you are still not seeing CLiR panel in Extensions (legacy), email me!
I'm a Mac user, what is Rosetta ?
Rosetta is a software emulator designed by Apple that allows Mac computers with Apple silicon to run apps built for Intel-based Macs. This allows users to run older software or software that hasn’t been updated for Apple silicon without the need for developers to recompile their software for the new architecture. Rosetta translates the app’s code at runtime, allowing it to function on the new architecture.
More information :
Photoshop for Apple Silicon
If you need to install Rosetta on your Mac
Watch how to activate Rosetta (from 0:25 to 1:25)
Run Photoshop with Rosetta
I'm using Lightroom Classic and I don't see CLiR panel. How would I edit my RAW images without a Photoshop panel ?
CLiR Panel is a Photoshop companion. Therefore, it will only be available within Photoshop.
However, CLiR does offer a seemless solution for editing RAW infrared images.
The CLiR Infrared Mastery Course covers how to edit infrared images in RAW file format. RAW files contain all the data captured by your camera’s sensor, including infrared light, before any processing or compression is applied. This makes RAW files an ideal format for infrared photography, as they allow for maximum control and flexibility in editing.
In the CLiR course, you will learn how to import and edit RAW files from your infrared camera using software such as Adobe Camera RAW and Lightroom Classic. You will also learn about the specific adjustments needed for infrared images, such as white balance correction, contrast adjustments, and false color conversion by using color channel swap.
By learning how to edit your infrared images in RAW format, you can achieve greater control over the final result and bring out the best in your images. With the skills and techniques taught in the CLiR course, you’ll be able to create unique and striking infrared images that stand out from traditional photography.
More info on the CLiR RAW Infrared Workflow
See CLiR editing RAW files in action :
More on the CLiR Infrared Mastery Course :
Can you tell me a bit more about CLiR RAW workflow, and camera profiles ?
The CLiR Infrared Mastery Course offers a comprehensive library of 450 camera profiles that have been carefully created to optimize light and color rendition, making it easy for photographers to produce high-quality infrared images.
Camera profiles are essential for achieving accurate and consistent results when processing RAW files from various camera models. With such a wide range of camera profiles available, the course simplifies the process of processing and editing infrared images, saving photographers valuable time and effort.
This feature eliminates the need to install or use the Adobe DNG Editor, saving time and effort and allowing photographers to focus on the creative aspects of their work and produce high-quality infrared images more efficiently.
See RAW editing in action :
My camera is not listed, I cannot find my camera's brand and model in the CLiR Infrared dcp Profile Library! What shall I do?
If you cannot find your camera’s brand and model in the CLiR Infrared dcp Profile Library, click the link below :
I have many filters for my camera. How many profiles do I need ?
You only need to install one profile per camera, even if you own multiple filters.
A “dcp” profile, also known as “camera-centric”, is specific to a particular camera model and brand because it is created using the unique color data captured by that camera’s sensor. It cannot be duplicated or used for another camera model, even if they are from the same brand. For example, renaming a file from “Canon 5D Mark II” to “Canon 5D Mark III” won’t work for the latter. A dcp profile must be constructed using a RAW file from the camera for which it is intended.
The list of dcp profiles supplied with CLiR 1.2 Mastery Course
When to use CLiR Infrared Profiles?
Use CLiR Infrared custom dcp profiles when shooting with the following filters:
- Dual Pass (blue glass, a.k.a. “Super Blue”; typically blocks Visible Light, pass only UV and iR)
- 550nm (orange glass)
- 590nm (deep orange glass)
- 665nm (red glass)
- 720nm (very deep red glass)
- 820nm and above (black glass)
Note 1: LifePixel “Hyper Color” (470nm), and Kolari’s exclusive iRChrome (blue glass filter) do not need custom dcp infrared profiles for editing. These two are the only exceptions.
Note 2: When editing RAW with infrared dcp profile for better White Balance rendering, it is now up to you to adjust and optimize the Temperature + Tint sliders to get maximum color separation and diversity, and reduce color cast.
EXTRA TIP: When shooting with Kolari’s “iR Chrome” filter, I’d advise you to set your camera internal Custom White Balance (CWB) to 10,000K. That’s a nice start to enjoy this filter.
What are CLiR Advanced Infrared Presets ?
The CLiR Infrared Mastery Course offers unique features, such as advanced presets for Adobe Lightroom Classic and Camera RAW that can replicate the effect of a channel mixer.
The channel mixer is a Photoshop tool only. In infrared photography, the channel mixer can be used to adjust the sky and foliage color representation of infrared light. Typically, you would want the sky to appear blue and leaves to lean towards yellow, depending on the filter used. By providing advanced presets that mimic the effect of the channel mixer, the CLiR course allows photographers to achieve high-quality results with less effort.
Additionally, the course provides hand-made presets that enable you to add a channel swap directly within your favorite RAW editor, even though LightRoom and Camera RAW don’t have a channel mixer.
Using CLiR Advanced Presets comes with an added benefit of eliminating the need to switch between Adobe Lightroom Classic, Camera RAW, and Photoshop just to access the channel mixer. This not only saves time but also preserves the original RAW file format of your image, allowing you to continue making adjustments to white balance temperature, tint, and other crucial parameters during infrared post-processing in your preferred RAW editor.
Note: the course also includes hundreds of custom camera profiles in the form of CLiR Camera Profiles (.dcp file) to help you have complete control over crucial parameters such as White Balance, Temperature and Tint during RAW infrared post-processing.
Conclusion: By using CLiR Infared camera profiles and CLiR advanced infrared presets, you’ll unlock endless possibilities and enjoy instant gratification, so you can dive straight into the creative phase of your work.
How to install CLiR Infared camera profiles
How to install CLiR advanced infrared presets
What language is used within CLiR Infrared Mastery Course, and Photohsop panel ?
CLiR Infrared Mastery Course tutorials and videos are in English.
CLiR panel is in English, but is fully functional on all languages of Photoshop.
I want to learn more, do you supply any other videos for infrared photography ?
I do offer one-to-one coaching sessions! This personalized approach is an excellent way to make significant progress in this specialized area of photography. During our sessions, you’ll receive tailored attention and guidance to help you develop your infrared photography skills and achieve your goals.
Plus, because our sessions are conducted online, you can participate from anywhere in the world at a time that’s convenient for you.
If you’re interested in taking advantage of the benefits of personalized one-to-one coaching and improving your infrared photography skills, please feel free to contact me to schedule a session at your convenience.
That’s a wrap!
Overall, the CLiR Infrared Mastery Course is a comprehensive and in-depth program for photographers who want to master the art of infrared photography.
Whether you’re a beginner or an experienced photographer, the course provides valuable insights and techniques that can help you take your infrared photography to the next level.
CLiR puplic page
CLiR Customers Private Group
I LOVE INFRARED