Install CLiR Infrared Studio UXP plugin in Photohsop CC
| 1️⃣ Navigate to the folder CLiR PLUGIN |  |
| 2️⃣ Open the folder and place the CCX file on your Desktop before installation |
| 3️⃣ Double Click on the file : CLiR_InfraredStudio.ccx |
 |
| 4️⃣ The Creative Cloud Desktop App will open and prompt you to verify the plugin. |
| 5️⃣ Select Install and click OK |
| 6️⃣ Once installed, you will get a message with successful installation, and it should open in Photoshop. |
| ✅ You will find the CLiR Infrared Studio UXP plugin in the Plugins menu of Photoshop : |

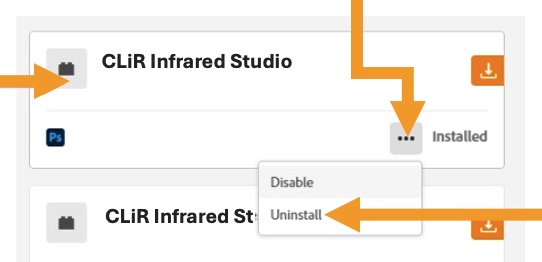
Remove CLiR Infrared Studio UXP plugin from Photohsop CC
| 1️⃣ To remove the panel from Photoshop, go to the Plugins menu, and select Manage Plugins… |

|
2️⃣ Find the CLiR Infrared Studio plugin in your list of active plugins and click on the three dots to select Uninstall |
Troubleshooting the Panel – Installation Errors
Problem: CCX file doesn’t open in Marketplace and returns an Error Code 2.
Solution #1:
- Copy the CCX file to your desktop and double click it from there.
- If that didn’t solve the issue, the CCX file might have been compromised during downloading or unzipping process. Kindly download the file again.
- If that didn’t solve the issue, try Solution #2.
Solution #2:
- Try uninstalling your Creative Cloud App. If it prompts you to repair it or uninstall, choose the repair option. This should solve the issue.
- If this doesn’t solve the issue, uninstall Creative Cloud App completely and reinstall it after a system restart.
- Continue with installation process of the CLiR Infrared Studio plugin in Solution #1.
Problem: when double click on the CCX file, the installer opens but gives Error Code 10.
Solution:
- Copy the CCX file to your desktop and double click it from there.
- Error code 10 means that the file name for the CCX file or its actual path on your hard drive is not correct or too long. By copying the CCX file on your desktop, the error code 10 should not appear anymore.
❌ What if CCX doesn’t open Creative Cloud Installer
Problem: when double click on the CCX file, the installer is not opening, the panel don’t get installed.
Solution:
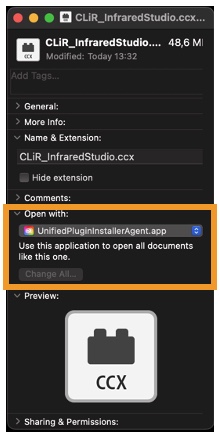
- Right click on the CCX file, (on Mac, choose Get Info), make sure “Open with” is set to UnifiedPluginInstallerAgent.app
- Eventually, click “Change” (PC) or “Change All” (Mac)
❌ Cannot find Plugin Installer in option menu “Open With”
Problem: Cannot find the UnifiedPluginInstallerAgent option in the list of applications to launch when double click on the CCX file
Solution on Mac
- In the “Open With” section, select “Other” and navigate to the UnifiedPluginInstallerAgent via the below path:
Macintosh HD > Library > Application Support > Adobe >
Adobe Desktop Common > RemoteComponents > UPI >
UnifiedPluginInstallerAgent > UnifiedPluginInstallerAgent
Solution on PC
- In the “Open With” section, scroll to the bottom of the list and select “Look for another app on this PC”.
Choose the UnifiedPluginInstallerAgent.exe file after navigating to the below path:
C:\Program Files\Common Files\Adobe\Adobe Desktop Common\RemoteComponents\UPI\UnifiedPluginInstallerAgent